Thank you for choosing Netrunner 13.12 GNU/Linux OS Standard version.
Here is a quick overview how to use certain parts of the system.
Issues and Recommendations:
We recommend updating Muon and the Taskmanager (resolving the issue of some programs switching places during startup notifications phase).
The updated packages “expanding-icons-taskmanager” and “muon” are available via the standard repos by using Muon Update Manager, Synaptic or typing these commands:
sudo apt-get update

sudo apt-get install expanding-icons-taskmanager muon
How to disable Secure Boot (UEFI)
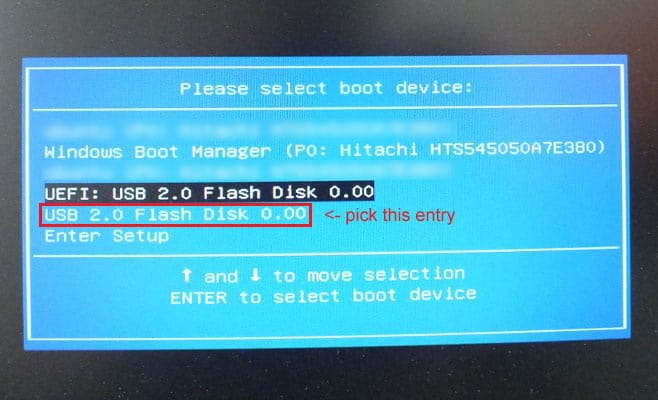
If the installer crashes, you need to make sure Secure Boot is disabled.
Also, from the boot-options, use the non-uefi entry if possible (below that is the SECOND OPTION without the UEFI in front):

If you boot in LIVE mode and the Netrunner Logo comes up, but the desktop does not start (AMD E1 with RADEON “kabini”):
Boot until you see the live system options, then go to “Start Netrunner” and press TAB instead of enter:
Now you can add “vga=normal nomodeset” to the boot options in the bootmenu and press Enter to start in vga/vesa compatibility mode.
If you find an issue and want us help fixing it, please post in our forums or report the issue at github:
https://github.com/netrunner/netrunner-feedback/issues
Tips and Hints:
F11 or Mouse Swipe to toggle Sidebar:
You can show or hide the sidepanel by pressing F11-key or use a so called mouse-swipe (similar motion like swiping desktops on a tablet).
To make a successfull swipe to activate the sidepanel, move the mouse cursor from right to left and start pressing left mouse button while doing so, then release. (TIP: To practice mouse swipes, start “Cut the Rope” Game, and you’ll very likely make a successfull swipe with cutting first rope – it’s become swipe-training game! 😉 To play it normally, look for easystroke symbol in systray and disable it temporary with right click).
The timer is set in such a way, that this usually differs from similar mouse movements, to prevent accidently execution of toggle panel.
To setup new gestures, look for the “easystroke icon” in systray.
(make sure you click on the actual icon of easystroke with right mouse click to make it to show options).
An example idea would be a gesture from top to bottom to invoke yakuake with F12 Command-Key or Homerun – from anywhere anytime.
Hot Corner:
Touching the lower right corner of the screen automatically reveals the desktop. Touching it again will bring up the windows back in same state and order they were before.
Install Netflix: |
|---|
|
1. Open a terminal window.
|
|
2. Type in the following commands then hit Enter after each.
|
|
sudo apt-add-repository ppa:ehoover/compholio
sudo apt-get update sudo apt-get install netflix-desktop |
If you experience issues with Silverlight, try the following command “rm -Rf ~/.wine-browser”
If corefonts are not installed properly, try this command (use TAB key to go to “OK” and “Enter” to accept EULA):
sudo apt-get install --reinstall ttf-mscorefonts-installer
For more, see the original article:
http://linuxg.net/how-to-install-netflix-desktop-0-8-1-on-ubuntu-13-10-13-04-12-10-12-04-10-04-and-linux-mint-15-14-13/
Webaccounts
![]()
Webaccounts let you connect and integrate your resources from providers like Facebook, Google, owncloud or Runners-ID.
When you successfully connect to an account, you have access to contacts or files within various KDE programs like Kontact or Dolphin.
For example, if you connect to an owncloud account, an automatic connection is made to your webfolder and added as a shortcut under Dolphin – Network.
samba-mounter
(Add Network Drive)
![]()
samba-mounter helps you mount NAS drives with a GUI and make them available transparently for KDE and non-KDE programs.It also tries to reconnect them during next startup, so they are available without re-configuration.Added folders are also displayed under a special “Network” folder in your “home” directory, so you can access (read and write) them directly with your applications like amarok, libreoffice, etc.
For more tutorials check our Screencast section with Video Tutorials.